

The following article contains Shopify affiliate links.
Welcome to the ultimate guide for setting up your Shopify store in 2024! Whether you’re a seasoned entrepreneur or just dipping your toes into the world of ecommerce, this step-by-step guide will help you create a robust and successful Shopify store.
In this comprehensive guide, we will cover every aspect of setting up your Shopify store, from the very beginning to advanced marketing strategies. So, let’s roll up our sleeves and get started!
Step 0: Prep Work
Before setting up your Shopify plan, it’s essential to prepare thoroughly to ensure a smooth setup process and to select the plan that best suits your business needs. Here are key preparations to consider:
Understand Your Business Model and Goals
- Identify Your Products or Services: Know what you will be selling, whether physical goods, digital products, or services.
- Define Your Target Audience: Understand who your potential customers are, including demographics, preferences, and shopping habits.
- Set Clear Business Goals: Outline what you aim to achieve with your online store, such as reaching a specific sales target or expanding your customer base.
Analyze Your Budget
- Estimate Startup Costs: Consider all initial expenses, including inventory, branding, marketing, and any third-party services or apps you might need.
- Monthly Budget: Determine how much you can afford to spend on your Shopify subscription and additional features or apps monthly.
Research and Decide on Your Brand Elements
- Brand Name: Have a business name that is unique, memorable, and reflects your brand identity.
- Logo and Design Elements: Prepare your brand’s visual elements, including logos, color schemes, and fonts.
- Domain Name: Consider purchasing a domain name that matches your brand for a more professional look.
Plan Your Inventory
- Product Selection: Know what products you will start with and any variations (size, color, etc.).
- Inventory Management: Decide on how you will manage inventory—whether you will hold stock yourself, dropship, or use a fulfillment service.
Consider Your Marketing and SEO Strategy
- Marketing Plan: Outline how you will attract customers to your store through social media, content marketing, email campaigns, etc.
- SEO Keywords: Research relevant keywords to optimize your product descriptions, blog posts, and other website content for search engines.
Legal and Administrative Preparation
- Business Registration: Ensure your business is registered according to your local laws and regulations.
- Tax Information: Understand the tax obligations for your business, including sales tax collection and reporting.
- Payment Gateway: Decide on which payment gateways you will use and understand their fee structures.
Familiarize Yourself with Shopify
- Shopify Features and Plans: Review the different Shopify plans and features to understand what each offers and how they align with your business needs.
- Shopify App Store: Explore the Shopify App Store to identify any apps that could enhance your store’s functionality.
- Shopify Themes: Look at available themes to decide on the look and feel of your online store.
Technical Preparations
- High-Quality Product Images: Prepare high-quality images for all your products.
- Product Descriptions: Write clear, compelling product descriptions that highlight the benefits of your products.
- Shipping and Return Policies: Outline your shipping rates, carriers, delivery times, and return policies.
By completing these preparations before setting up your Shopify plan, you can make more informed decisions, streamline the setup process, and create a strong foundation for your online store’s success.
Step 1: Setting Up Your Shopify Plan
Alright, now that the preliminary stuff is out of the way, we move on to selecting the appropriate Shopify plan. This is a critical decision that directly influences the features and scalability of your online store. Here’s a breakdown of how to make this decision:
Visit Shopify’s Pricing Page
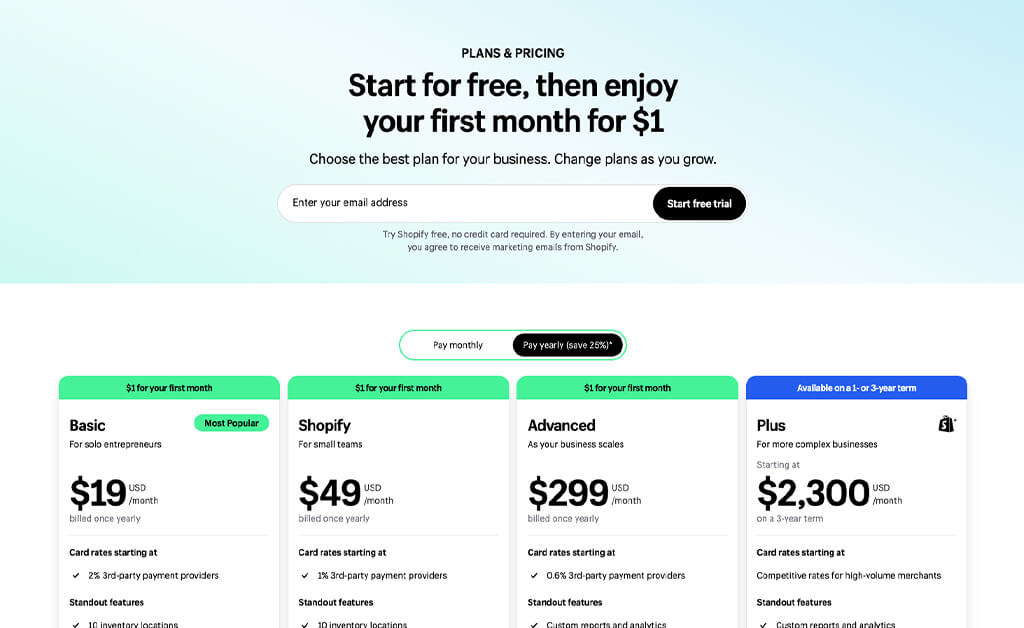
Begin by navigating to Shopify’s pricing page, where you’ll find detailed information about the available plans. Each plan offers different features, pricing structures, and levels of support.
Compare Plans Based on Your Needs
Shopify offers a range of plans tailored to meet the needs of different merchants, from small startups to large enterprises. Each plan comes with its own set of features and benefits designed to support businesses at various stages of growth and, at the time of writing this, there is a special going on where you can get any plan and only pay $1/month for the first 3 months. Here’s an overview of the different Shopify plans and how they can benefit merchants:
Shopify Basic $29/month
Target Audience: Ideal for new or small businesses that are just starting out.
Benefits:
- Access to Shopify’s powerful ecommerce platform, including website and blog creation tools.
- Ability to sell an unlimited number of products.
- Access to sales channels (e.g., online, mobile, in-person, online marketplaces, and social media).
- 24/7 support.
- Integration with shipping carriers and competitive shipping rates.
- Fraud analysis to help identify and mitigate risks.
Shopify $79/month
Target Audience: Growing businesses that require more advanced features.
Benefits:
- All the features of Shopify Basic, plus:
- Lower credit card rates and transaction fees.
- Professional reports to help with decision-making.
- The ability to create and use gift cards.
Advanced Shopify $299/month
Target Audience: Larger businesses or those scaling quickly and needing advanced reporting and shipping.
Benefits:
- All the benefits of the Shopify plan, plus:
- Advanced report builder for customized reporting.
- Third-party calculated shipping rates, allowing for more accurate shipping costs at checkout.
- Lower transaction fees and credit card rates than the Shopify plan.
Shopify Plus $2,500/month
Target Audience: High-volume merchants and large businesses requiring a scalable, enterprise-level solution.
Benefits:
- All the benefits of the Advanced Shopify plan, plus:
- Dedicated support with a Merchant Success Manager.
- Advanced customization options for the checkout process.
- Higher API call limit, allowing for more integrations and custom apps.
- Access to Shopify’s Launch Engineer to help with the setup process.
Sign Up for Your Selected Plan
Once you’ve decided on the right Shopify plan for your business, the next step is to sign up and get started. Here’s what you need to do:
- Initiate the Sign-Up Process: Click on the corresponding button to sign up for the plan you’ve selected. If you’re new to Shopify, you may be eligible for a 14-day free trial, allowing you to explore the platform and its features before committing to a paid plan.
- Provide Your Information: Enter your email address, desired password, and store name. Your store name will become your default URL (e.g., mystore.shopify.com), but you can change this later with a custom domain.
- Complete the Sign-Up Process: Follow the prompts to complete the sign-up process. You may need to provide additional details about your business and billing information to finalize your account setup.
- Start Your Free Trial (If Applicable): If you’ve opted for a free trial, you’ll gain immediate access to your Shopify dashboard, where you can begin setting up your store and exploring its features.

Step 2: Setting Up Your Store
When you begin setting up your Shopify store, you’re not just launching an online business; you’re setting the foundation for your brand’s online presence. Shopify’s initial setup guidance is designed to simplify this process:
Add Your Products
Adding products to your Shopify store involves more than just listing them. Provide detailed product descriptions, high-quality images, and relevant tags and categories. This not only helps customers make informed decisions but also improves search engine optimization (SEO).
- Navigate to Products: From your Shopify admin dashboard, click on “Products” then “Add product”.
- Enter Product Details: Add titles, descriptions, photos, and prices. High-quality images and detailed descriptions can help boost sales.
- Set Up Inventory Tracking: Input SKU numbers and barcodes if you have them. Enable inventory tracking to manage stock levels.
- Organize Products: Use product types and tags to categorize your products, making it easier for customers to find them.
💡Merchandising Tips
Enhance Product Listings with High-Quality Content
To make your product listings stand out, include compelling content that highlights the features and benefits of each product. Consider the following tips:
- Use professional product photography to showcase your merchandise in the best light. Invest in high-quality images that accurately represent your products and grab customers’ attention.
- Write detailed and persuasive product descriptions that highlight key features, benefits, and unique selling points. Use descriptive language and include relevant keywords to improve search visibility.
- Set competitive prices that offer value to customers while ensuring profitability for your business. Consider pricing strategies such as tiered pricing, discounts, or bundle offers to attract shoppers and increase sales.
Organize Products Into Categories and Collections
Organizing your products into categories and collections helps customers navigate your store more easily and find what they’re looking for. Here’s how to organize your products effectively:
- Create product categories based on common attributes or product types (e.g., apparel, accessories, electronics).
- Create collections for seasonal promotions, featured products, best sellers, or curated selections.
- Assign products to relevant categories and collections to ensure they appear in the appropriate sections of your store.
- Use navigation menus, filters, and search functionality to make it easy for customers to browse and discover products within your catalog.
Optimize Your Product Presentation
To maximize the effectiveness of your product catalog, consider the following additional tips:
Continuously update and refresh your product catalog with new arrivals, seasonal offerings, and promotions to keep customers engaged and coming back for more.
Use social proof elements such as customer reviews, ratings, and testimonials to build trust and credibility with potential buyers.
Implement product variations (e.g., size, color, style) to offer customers more options and increase the likelihood of conversion.
Monitor product performance metrics such as sales, conversion rates, and inventory levels to identify top-performing products and optimize your catalog accordingly.
Use Product Recommendations and Featured Products
Showcase your top-selling or featured products prominently on your homepage and throughout your store to capture customers’ attention. Consider the following strategies:
- Use product recommendation widgets or sections on your homepage to suggest related or complementary products based on customers’ browsing history or purchase behavior.
- Highlight featured products or best sellers in dedicated sections to showcase popular items and encourage exploration.
- Implement dynamic product carousels or sliders to showcase a variety of products and keep the homepage visually engaging.
Implement Upselling and Bundling Strategies
Upselling and bundling techniques can help increase the average order value and drive additional revenue. Consider the following strategies:
- Offer upsells at checkout by suggesting higher-priced or complementary products that enhance the customer’s purchase.
- Create product bundles or packages that combine related products at a discounted price, encouraging customers to buy multiple items together.
- Display product recommendations such as “Customers who bought this item also purchased” to suggest additional products that complement the customer’s current selection.
Regularly Update Product Displays and Promotions
Keeping your store fresh and engaging is essential for retaining customers’ interest and encouraging repeat visits. Consider the following tactics:
- Rotate featured products and promotions regularly to highlight new arrivals, seasonal offerings, or limited-time deals.
- Create thematic displays or collections around holidays, events, or trending topics to capitalize on seasonal trends and drive excitement.
- Experiment with different merchandising layouts, imagery, and messaging to see what resonates best with your audience and drives the highest conversion rates.
Monitor Performance and Optimize Continuously
To ensure the effectiveness of your merchandising strategies, it’s essential to monitor performance metrics and make data-driven optimizations. Consider the following approaches:
- Use Shopify analytics and reporting tools to track key performance indicators such as conversion rates, average order value, and sales attribution.
- Analyze customer behavior and sales data to identify trends, patterns, and opportunities for improvement.
- A/B test different merchandising tactics, product placements, and promotional offers to determine what drives the best results.
- Implement customer reviews and ratings to build trust and credibility with potential buyers and encourage social proof.
Step 3: Customize Your Store
Choose a Theme: Go to “Online Store” > “Themes”. Shopify offers free and paid themes tailored to various industries and styles. Preview and install the one that fits your brand.
- Customize Your Theme: Click “Customize” to start editing your theme. You can change layouts, colors, fonts, and add your branding elements like logos.
- Add Pages: Create essential pages such as “About Us”, “Contact”, “FAQ”, and “Privacy Policy”. Go to “Online Store” > “Pages” to add new pages.
- Set Up Navigation: Organize your site’s menus under “Online Store” > “Navigation”. Create a user-friendly navigation system to help customers find products and information.
Choosing a Theme
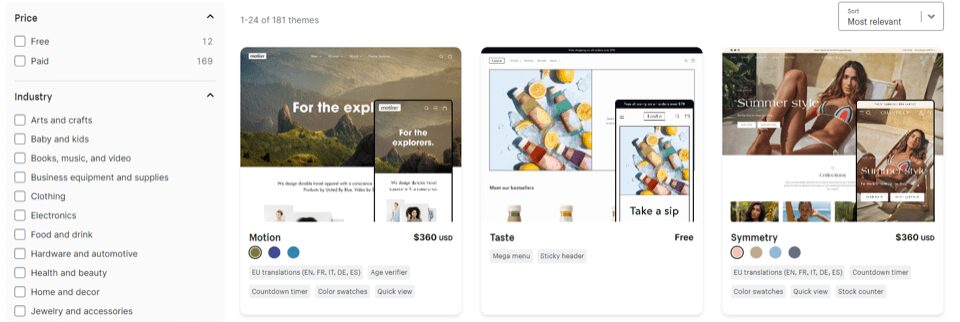
Your online store’s appearance plays a crucial role in attracting and engaging customers. Shopify offers a diverse selection of customizable themes, allowing you to create a visually appealing and user-friendly storefront that aligns with your brand identity. Follow these steps to choose the perfect theme for your store:
Shopify provides a variety of themes to choose from, ranging from free options to premium ones. Click on “Explore Free Themes” to browse through the selection of free themes available. If you’re interested in premium themes with advanced features and customization options, click “Visit Theme Store” to explore the premium offerings. Here are some important characteristics to consider when choosing your theme:
- Responsive Design: A good theme must be mobile-friendly, adapting seamlessly to different screen sizes and devices. With a significant portion of online shopping done on mobile devices, a responsive design ensures that your store is accessible and easy to navigate for all users.
- Customization Options: Flexibility in customization allows you to tailor the theme to match your brand’s identity and meet your specific needs. Good themes offer a variety of customizable options without requiring you to touch the code.
- Fast Loading Times: Speed is critical for online shopping. A good Shopify theme is optimized for fast loading times, improving user experience and SEO rankings.
- SEO-Friendly: A theme that is designed with SEO in mind can help your store rank higher in search engine results, increasing visibility and driving more traffic to your site.
- User Experience (UX)-Oriented: Good themes prioritize the shopper’s experience by featuring clear navigation, intuitive layout, and easy-to-use interfaces, making it simpler for customers to browse and purchase.
- Support and Documentation: Reliable support from the theme developer, along with comprehensive documentation, can significantly ease the theme customization and troubleshooting processes.
- Regular Updates: A theme that receives regular updates is more likely to stay compatible with the latest Shopify features and security requirements.
Preview and Install Your Chosen Theme
Take the time to preview each theme to see how it looks and functions. You can view live demos of the themes to get a better sense of their design and layout. Once you’ve found a theme that resonates with your brand and meets your requirements, click “Install” to add it to your store.
Publish Your Selected Theme
After installing the theme, click on “Actions” and then select “Publish” to make it live on your store. This will apply the theme’s design and layout to your storefront, allowing customers to see the changes immediately.
💡Theme Tips
Consider Customization and Professional Design
While Shopify’s pre-made themes offer a convenient way to design your store, you may also consider hiring a professional designer to create a custom theme tailored to your brand’s identity and specific requirements. A custom-designed theme can provide a unique and polished look for your store, helping you stand out from competitors and create a memorable shopping experience for your customers.
Theme Troubleshooting
Problems can range from content display errors, such as misaligned images or text, to more severe functionality breakdowns, where certain elements of the store don’t work as intended. Here are some practical steps and advice to help you troubleshoot and resolve these issues effectively:
- Review Theme Documentation and Support
- Most themes come with detailed guides on setup, customization, and troubleshooting. This documentation can offer insights into common issues and their resolutions. If the problem persists, don’t hesitate to reach out to the theme’s support team.
- Check for Compatibility Issues
- Check the theme’s compatibility requirements against your current Shopify version and any apps you are using. Sometimes, updating your Shopify store or removing conflicting apps can resolve these issues.
- Utilize Shopify’s Theme Preview Feature
- Before making any theme live, use Shopify’s theme preview feature to thoroughly check your store’s functionality and appearance. This allows you to identify and address any glaring issues in a sandbox environment without affecting your live store’s user experience.
- Customize Your Theme Settings
- Dive into your theme’s customization settings to adjust layout options, font sizes, or image alignments. Minor tweaks can often fix display issues without the need for technical intervention.
- Check Custom Code
- Custom code can conflict with the theme’s original code and cause unexpected behavior. Try removing or commenting out custom code to see if that resolves the issue.
- Test on Different Devices and Browsers
- Test your store on various browsers (Chrome, Firefox, Safari) and devices (desktop, tablet, mobile) to see if the issue replicates across the board. This can help you pinpoint if the problem is widespread or isolated.
- Reset to Default Theme Version
- If all else fails, consider resetting your theme to its default version. While this means you’ll lose any customizations made, it can also eliminate any inadvertent changes that might have caused the issue.
- Seek Professional Help
- For complex issues that you can’t resolve through documentation, support, or troubleshooting, it might be time to seek professional help. Shopify experts and developers can offer deeper insights and solutions to get your store looking and functioning as you envision.
Step 4: Set Up Payments
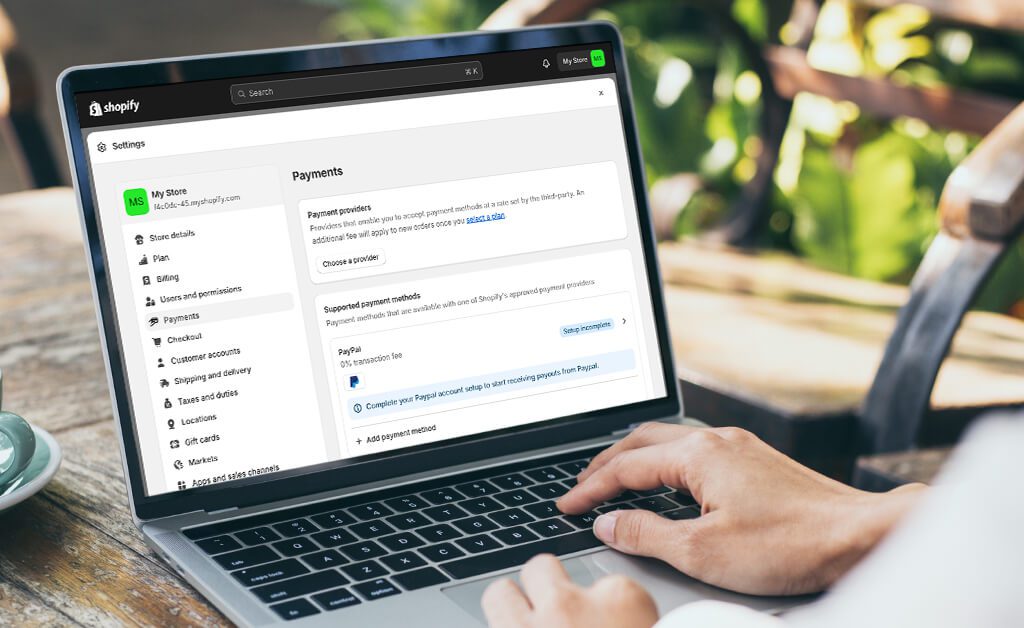
Providing convenient payment options is crucial for improving customer satisfaction and increasing sales. Shopify offers features like Shop Pay for faster checkout and installment payment options to enhance flexibility for shoppers. Here’s how to set up these payment methods:
1. Configure Payment Providers: Go to “Settings” > “Payments”. Shopify supports various payment gateways, including Shopify Payments, PayPal, and third-party providers.
2. Choose Your Payment Gateway: Consider transaction fees, card types, and geographical location when choosing. Shopify Payments simplifies the process and usually offers competitive rates.
3. Set Up Checkout: Customize your checkout experience in the “Settings” > “Checkout” section. You can decide if customers need to create an account and what information they must provide.
💡Payment Tips
In addition to Shop Pay and installment payment options, it’s essential to offer a variety of payment methods to accommodate different customer preferences. Consider integrating popular payment gateways like PayPal, Apple Pay, and Amazon Pay, along with credit/debit card payments:
- PayPal: Allows customers to pay securely using their PayPal account or credit/debit card.
- Apple Pay: Enables seamless checkout for customers using Apple devices with Touch ID or Face ID.
- Amazon Pay: Offers a familiar and convenient checkout experience for customers with Amazon accounts.
Enable Shop Pay for Faster Checkout
Shop Pay is a feature offered by Shopify that allows customers to save their shipping and payment information securely, making the checkout process faster and more convenient. Follow these steps to enable Shop Pay:
- Within the Payment providers section, locate the Shop Pay option and click on it to configure settings.
- If Shop Pay is available in your region and compatible with your Shopify plan, you’ll have the option to enable it. Simply toggle the switch to turn Shop Pay on.
- Once enabled, customers will see the Shop Pay option at checkout, allowing them to expedite the payment process with their saved information.
Consider Integrating Installment Payment Options
Shopify offers integration with “Buy Now, Pay Later” apps that allow customers to split their purchases into smaller, more manageable payments over time. This flexibility can appeal to customers who prefer to spread out their payments. Here’s how to consider integrating installment payment options:
- Explore the available “Buy Now, Pay Later” apps in the Shopify App Store and choose one that aligns with your business goals and customer demographics.
- Install and configure the chosen installment payment app according to the provider’s instructions. This typically involves connecting the app to your Shopify store and customizing settings such as payment schedules and terms.
By offering a diverse range of payment methods, including Shop Pay, installment payments, and other popular options, you can enhance the shopping experience for your customers and increase conversion rates on your Shopify store.
Step 5: Configuring Shipping
For shipping, Shopify allows you to set up various shipping rates and options. Consider your shipping strategy—whether you’re offering free shipping, flat-rate shipping, or real-time carrier rates—and set up your shipping zones accordingly. Here’s a detailed guide to enhancing your shipping setup on Shopify:
1. Define Shipping Zones
- Navigating to Shipping Settings: In your Shopify admin, click on “Settings”, then select “Shipping and Delivery”. This is where you can manage all aspects of shipping.
- Creating Shipping Zones: Shipping zones are geographical areas where you deliver orders. Create different zones for domestic and international destinations to tailor your shipping strategies.
- Assigning Countries or Regions: For each zone, you can specify which countries or regions are included. This helps in offering precise shipping rates and services tailored to each area.
2. Choose Shipping Rates
- Types of Shipping Rates:
- Free Shipping: This can be a powerful incentive for customers to complete their purchases but consider how it affects your margins.
- Flat-Rate Shipping: A fixed shipping cost regardless of the order size or value. It simplifies calculations but may not always cover your actual shipping costs.
- Calculated Shipping Rates: Rates are based on the order’s weight, dimensions, or total price. This requires integration with carrier services for real-time rates.
- Carrier Integration: Shopify allows integration with major carriers like UPS, FedEx, and USPS for real-time shipping rates. This ensures that the shipping costs are accurate and based on current carrier prices.
- Custom Rates: For unique scenarios or special promotions, you can also set up custom shipping rates that don’t fit the standard models.
3. Set Up Local Delivery or Pickup
- Local Delivery: A great option for businesses with a physical presence or those looking to offer personalized services. You can set a delivery radius, minimum order amounts, and delivery fees.
- In-Store Pickup: Allows customers to buy online and pick up their orders in-store. This can increase foot traffic to your physical location and reduce shipping overheads.
- Customizing Options: Both local delivery and pickup can be customized with specific conditions, such as availability times and special instructions for customers.
Additional Considerations
- Shipping Insurance and Tracking: Offering insurance and tracking options can enhance customer trust and satisfaction. Shopify integrates with several apps and carriers that provide these services.
- Handling Fees: If you need to cover additional expenses like packaging or handling special items, consider setting up handling fees. This can be included in your shipping rates to ensure your costs are covered.
- Promotions and Discounts: Use shipping options as a promotional tool. For example, offering free shipping on orders over a certain amount can encourage customers to purchase more.
Step 6. Setting Up Taxes
Ensuring that your store complies with tax regulations is essential to avoid legal issues and maintain trust with your customers. Here’s a step-by-step guide to setting up taxes correctly on your Shopify store:
1. Automated Taxes: Shopify can automatically handle most common sales tax calculations. Go to “Settings” > “Taxes” to review and adjust settings as necessary.
2. Manual Taxes: If needed, you can set up taxes manually for specific regions.
💡Tax Tips
- Research Tax Jurisdictions: The first step is to thoroughly understand the tax laws in both your business’s location and the locations of your customers. This includes sales tax in the United States, VAT (Value-Added Tax) in Europe, GST (Goods and Services Tax) in Australia and Canada, and other regional taxes.
- Consider Product Taxability: Not all products are taxed the same way. For example, clothing might be taxed differently than electronics or digital goods. Some jurisdictions also have tax exemptions for certain items or thresholds.
- Professional Consultation: Given the complexity of tax laws, consulting with a tax professional or accountant who is familiar with ecommerce and international sales is advisable. They can provide tailored advice and help you understand thresholds, exemptions, and obligations.
Step 7: Prepare for Launch

1. Remove Password Protection: By default, your store is password-protected. Remove this in “Online Store” > “Preferences” when you’re ready to go live.
2. Review Settings: Double-check your store’s settings, including payment, shipping, and taxes.
3. Test Your Store: Place several test orders to ensure the checkout process works smoothly. You can use Shopify’s Bogus Gateway for test payments.
💡Launch Tips
Rushing through the setup process can lead to mistakes or oversights that could affect your store’s performance:
- Review Everything
Before launching, review your site from a customer’s perspective. Check for any navigation issues and typos in your product descriptions, and ensure all your images load correctly.
- Test Your Checkout Process
Conduct a test order to ensure the checkout process is smooth and error-free. This includes testing payment processing, shipping options, and order confirmation emails.
- Seek Assistance if Needed
Leveraging Shopify’s support resources can significantly smooth out the setup process:
- Shopify Support: Available 24/7, Shopify’s support team can assist with both technical issues and general inquiries. Don’t hesitate to use live chat, email, or phone support if you encounter any problems.
- Shopify Community Forums: The forums are a great place to seek advice, learn from other merchants’ experiences, and find solutions to common problems.
- Hire a Shopify Expert: If you need more personalized assistance, consider hiring a Shopify Expert. These professionals can help with everything from store setup and custom design to marketing and SEO.
By taking these steps and utilizing the resources available, you can ensure that your Shopify store not only reflects your brand but is also primed for success.

Step 8: Market Your Store
- SEO: Optimize your store for search engines. Use relevant keywords in product titles and descriptions, and ensure your site structure is search engine friendly.
- Social Media: Leverage social media platforms to promote your store. Consider running ads to target your audience more precisely.
- Email Marketing: Collect email addresses and start an email marketing campaign to keep your customers engaged.
SEO: Creating Content in a Shopify Store
Quality content plays a vital role in driving traffic, engaging your audience, and establishing your brand as an authority in your industry. By incorporating various types of content such as blog posts, videos, and multimedia content, you can attract visitors to your Shopify store, educate them about your products or services, and build lasting relationships with your audience. Here’s how to create compelling content for your Shopify store:
Start a Blog
Launching a blog within your Shopify store is an effective way to provide valuable information to your audience while also improving your store’s SEO. Follow these steps to start a blog:
- Access your Shopify admin dashboard and navigate to the “Online Store” section.
- Click on “Blog Posts” to create and manage your blog content.
- Publish informative articles that address topics relevant to your products, industry trends, customer stories, and helpful tips or advice.
- Use a consistent tone and style that aligns with your brand identity, and aim to provide value to your readers with each post.
Utilize Video and Multimedia Content
Video and multimedia content can be highly engaging and visually appealing, helping to showcase your products and tell your brand story effectively. Consider the following strategies:
- Create product demonstration videos, tutorials, or how-to guides to educate customers about your products and demonstrate their benefits.
- Share behind-the-scenes content, such as footage of your team at work, product development processes, or customer testimonials, to humanize your brand and build trust with your audience.
- Utilize platforms like YouTube, Instagram, or TikTok to host and share your video content, and embed videos directly into your Shopify store’s product pages or blog posts for added impact.

Optimize Content for SEO
To ensure your content is discoverable and ranks well in search engine results, it’s essential to optimize it for SEO. Follow these best practices:
- Conduct keyword research to identify relevant keywords and phrases related to your products, industry, and target audience.
- Incorporate these keywords naturally into your content, including in titles, headings, body text, meta descriptions, and alt tags for images.
- Write compelling meta descriptions that accurately summarize the content of your pages and entice users to click through to your site from search engine results pages (SERPs).
💡SEO Tip: Maintain Consistency and Collaborate
Consistency is key to building a successful content strategy. Maintain a regular posting schedule for your blog and social media channels to keep your audience engaged and coming back for more. Additionally, consider collaborating with influencers or industry experts to create guest posts, interviews, or co-branded content that can help expand your reach and attract new audiences.
Social Media & Ads: Google Ads, Meta Ads, Google Shopping, and Meta Shopping Feeds
Advertising through platforms like Google Ads and Meta Ads (formerly Facebook Ads) allows you to reach potential customers effectively and drive targeted traffic to your Shopify store. By leveraging features like Google Shopping and Meta Shopping Feeds, you can showcase your products to a broader audience and increase your store’s visibility. Here’s how to get started with advertising:
1. Set Up Google Ads and Meta Ads Accounts
Setting up Google Ads and Meta Ads accounts is a crucial step for businesses aiming to harness the power of digital advertising to reach their target audience effectively. These platforms offer robust tools for creating, managing, and optimizing ads across Google’s vast network (including search, YouTube, and display ads) and Meta’s platforms (Facebook, Instagram, WhatsApp, and Messenger). Here’s a detailed look at the process and its importance:
Why Setting Up Accounts is Necessary:
- Reach and Precision: Google and Meta command enormous, diverse user bases. Their sophisticated targeting capabilities allow businesses to reach specific audiences based on demographics, interests, behaviors, and more.
- Data-Driven Insights: Both platforms provide detailed analytics and reporting tools, helping advertisers understand the performance of their campaigns and make data-driven decisions.
- Flexibility and Scalability: Advertisers can start with any budget, adjusting and scaling as they see fit based on campaign performance and business growth.
Important Steps for Setting Up:
Creating Accounts:
- Google Ads: Visit ads.google.com and follow the signup process. You’ll need a Google account to start.
- Meta Ads: Go to business.facebook.com and sign up. A Facebook account is required, and you’ll be prompted to create or link to a Facebook Page for your business.
Defining Advertising Budget:
- Budget decisions should reflect your marketing objectives, the competitiveness of your target market, and your overall marketing budget. It’s wise to start with a modest budget to test the waters and increase it based on the campaign’s ROI.
Adding Tracking Pixels:
- Google Ads Conversion Tracking: Implement the Google Ads conversion tracking pixel on your website to track actions visitors take after clicking on your ad. This is critical for measuring the effectiveness of your ads and optimizing them for better performance.
- Facebook Pixel: The Facebook Pixel is a code snippet for your website that allows you to measure, optimize, and build audiences for your ad campaigns. It’s essential for tracking conversions, remarketing to people who have taken specific actions on your website, and building targeted custom audiences.
Campaign Setup and Optimization:
- Campaign Goals: Define clear, measurable goals for your campaigns, such as increasing website visits, generating leads, or boosting sales.
- Target Audience: Use the platforms’ targeting options to specify who will see your ads. This can include targeting by location, age, gender, interests, behaviors, and more.
- Ad Creatives and Copy: Develop compelling ad creatives and copy that resonate with your target audience. A/B testing different versions can help identify what works best.
- Optimization and Testing: Continuously monitor your campaigns and use the insights gathered to optimize your ads, targeting, and budget allocation. Testing different elements of your campaigns systematically can uncover ways to improve performance and ROI.
Integrating with Marketing Strategy:
- Ensure that your Google Ads and Meta Ads efforts are integrated with your overall marketing strategy. This includes aligning your digital ads with your branding, other marketing channels (like email marketing and SEO), and overall business goals.
2. Create and Optimize Ad Campaigns
Once your accounts are set up, it’s time to create and optimize ad campaigns to promote your products effectively. Follow these steps:
- Conduct keyword research to identify relevant keywords and phrases related to your products and target audience.
- Create ad campaigns targeting these keywords, focusing on compelling ad copy and eye-catching visuals to attract clicks and engagement.
- Utilize audience targeting features to reach potential customers based on demographics, interests, and behavior. Tailor your ad messaging and offers to resonate with specific audience segments.
- Monitor the performance of your ad campaigns regularly and make adjustments as needed to optimize performance. Test different ad creatives, targeting options, and bidding strategies to identify what works best for your business.
3. Utilize Google Shopping and Meta Shopping Feeds
Setting up your product catalog on Google Shopping and Meta (formerly known as Facebook) can significantly enhance the visibility of your products by allowing them to appear directly on these platforms. This process involves several steps on each platform and requires attention to detail to ensure that your products are accurately represented and visible to potential customers. Here’s a breakdown of how to set up and troubleshoot the catalog on both Google and Meta.
Setting Up on Google Shopping
- Access Google Merchant Center: First, you need to create a Google Merchant Center account if you don’t already have one. This is where you’ll manage your product listings for Google Shopping.
- Create a Product Feed: Your product feed is a file that contains information about the products you want to list on Google Shopping. Within your Shopify admin dashboard, you can set up Google Shopping feeds by integrating with the Google Merchant Center. Shopify’s platform can automatically generate and update this feed for you.
- Link to Google Ads: To promote your products on Google Shopping, you’ll need to link your Merchant Center account to a Google Ads account. This allows you to create Shopping campaigns and manage your product listings’ advertising.
- Set Up Shipping and Tax: Google requires accurate shipping and tax information for your products. Ensure this information is correctly set up in your Merchant Center account to avoid listing issues.
Troubleshooting Google Shopping Issues
- Disapproved Products: If some of your products are disapproved, check Google’s product data specifications and ensure all required information is accurate and complete. Common issues include incorrect pricing, unavailable products, or missing images.
- Feed Errors: Regularly check your product feed for errors. Shopify provides notifications if there are issues with syncing your product feed to Google. Correct any errors in your Shopify dashboard to ensure your feed is up-to-date.
- Account Suspensions: Ensure you comply with Google’s policies. If your account is suspended, review the reason provided by Google and address any policy violations or required information.
Setting Up on Meta Shopping
- Access Meta Business Manager: Start by accessing your Meta Business Manager. You need a Facebook Business Page and a Business Manager account to create a catalog on Meta.
- Create a Catalog: In the Business Manager, you can create a new catalog for your products. Choose the e-commerce category for your catalog.
- Connect Shopify to Meta: Use Shopify’s Facebook channel to connect your Shopify store with your Meta catalog. This allows for automatic syncing of your products to Meta, ensuring your product listings are always up-to-date.
- Configure Settings: Ensure your shipping, returns, and payment settings are configured correctly on Meta. These settings are crucial for providing a smooth shopping experience for your customers.
Troubleshooting Meta Shopping Issues
- Catalog Sync Issues: If products are not syncing properly, check the integration settings within Shopify’s Facebook channel. Ensure that your product listings meet Meta’s requirements, such as image specifications and product description guidelines.
- Visibility Issues: If your products are not appearing on Meta, ensure they are published in your Shopify dashboard and that your Meta catalog settings allow for the products to be visible.
- Account or Catalog Restrictions: Meta has strict policies regarding what can be sold on their platform. If you encounter restrictions or your catalog is disabled, review Meta’s commerce policies and address any violations.
💡Ad Tip: Continuously Monitor and Adjust
To maximize the effectiveness of your advertising campaigns, it’s essential to continuously monitor their performance and make data-driven adjustments. Consider the following strategies:
- Track key performance indicators (KPIs) such as click-through rate (CTR), conversion rate, return on ad spend (ROAS), and cost per acquisition (CPA) to evaluate the success of your campaigns.
- Use retargeting ads to re-engage potential customers who have visited your store before but didn’t make a purchase. Customize your retargeting ads with personalized messaging and offers to encourage conversions.
- Experiment with different ad formats, targeting options, and ad placements to identify what resonates best with your audience and drives the highest return on investment (ROI).
TikTok Shopping Feeds
TikTok has emerged as a powerful platform for ecommerce, offering businesses the opportunity to reach a vast audience of engaged users through creative and engaging content. With TikTok Shopping Feeds, you can seamlessly integrate shopping functionality into your TikTok videos, allowing viewers to discover and purchase your products directly from the app. Here’s how to leverage TikTok Shopping Feeds effectively:
- Create a TikTok Business Account
To get started with TikTok Shopping Feeds, you’ll need to create a TikTok Business account and set up your profile:
- Download the TikTok app and sign up for a business account.
- Complete your profile by adding your business name, logo, and relevant information about your products or services.
- Verify your account to unlock additional features and access TikTok’s business tools and analytics.
- Develop Engaging TikTok Content
The key to success on TikTok is creating engaging and shareable content that resonates with your target audience. Here are some tips for creating compelling TikTok content:
- Showcase your products in creative and entertaining ways, such as through product demos, unboxings, or user-generated content.
- Incorporate popular TikTok trends, challenges, and hashtags into your content to increase visibility and reach a wider audience.
- Highlight promotions, discounts, and exclusive offers to incentivize viewers to make a purchase.
- Inject personality and authenticity into your videos to connect with viewers on a personal level and build brand loyalty.
- Utilize TikTok Shopping Feeds
TikTok Shopping Feeds allow you to tag products in your TikTok videos, enabling viewers to shop directly from your content. Here’s how to enable TikTok Shopping Feeds for your videos:
- Access the TikTok Creator Marketplace or work with a TikTok Partner Manager to gain access to the Shopping tab feature.
- Once you have access to the Shopping tab, you can tag products in your videos by selecting the “Tag Products” option when uploading or editing your video.
- Choose the products you want to feature in your video and add them as tags. Viewers can tap on these tags to view product details and make purchases without leaving the app.
💡TikTok Tip: Stay on Top of Trends and Collaborate with Influencers
To maximize the effectiveness of your TikTok marketing efforts, it’s essential to stay informed about the latest trends, challenges, and viral content on the platform. Here are some additional tips:
- Monitor trending hashtags, sounds, and themes on TikTok to identify opportunities for content creation and engagement.
- Collaborate with TikTok influencers or content creators in your niche to reach a wider audience and leverage their influence to promote your products.
- Experiment with different content formats, styles, and strategies to see what resonates best with your audience and drives the most engagement and conversions.

Email Marketing
Email marketing is a powerful tool for building relationships with customers, driving sales, and increasing brand loyalty. By leveraging email campaigns, newsletters, and automated workflows, you can engage with your audience, drive traffic to your store, and encourage repeat purchases. Here’s how to effectively implement email marketing for your Shopify store:
1. Integrate an Email Marketing App
To get started with email marketing, you’ll need to integrate an email marketing app with your Shopify store. Popular options include Klaviyo, Mailchimp, Omnisend, and many others. Follow these steps to integrate an email marketing app:
- Visit the Shopify App Store and search for your preferred email marketing app.
- Install the app and follow the setup instructions to connect it to your Shopify store.
- Once connected, you’ll have access to features such as email list management, campaign creation, automation, and analytics.
2. Create Email Campaigns and Newsletters
Once your email marketing app is integrated, you can start creating email campaigns and newsletters to engage with your subscribers. Consider the following types of email campaigns:
- Promotional Campaigns: Highlight new products, sales, or special offers to encourage purchases.
- Educational Content: Share valuable content, such as how-to guides, industry insights, or product tutorials, to provide value to your subscribers.
- Seasonal Campaigns: Tailor your emails to align with holidays, seasons, or special events to capitalize on seasonal trends.
- Newsletters: Keep your subscribers informed about your latest updates, product releases, and company news.
3. Segment Your Email List
Segmenting your email list allows you to send targeted and personalized messages to different groups of subscribers based on their behavior, demographics, and purchase history. Consider segmenting your email list by:
- Customer Behavior: Segment subscribers based on their interactions with your store, such as browsing history, purchase frequency, or engagement with previous emails.
- Demographics: Divide your subscribers based on demographic factors like age, location, gender, or interests.
- Purchase History: Create segments of customers who have made specific types of purchases or haven’t made a purchase in a while.
💡Email Tip: Personalize and Provide Value
Personalization is key to effective email marketing. Use merge tags to personalize your emails with subscribers’ names and other relevant information. Additionally, provide value to your subscribers by offering exclusive discounts, useful tips, or insider access to new products. Consider implementing the following strategies:
- Abandoned Cart Recovery: Set up automated emails to remind customers about items left in their shopping carts and encourage them to complete their purchase.
- Post-Purchase Follow-Ups: Send follow-up emails to thank customers for their purchase, request feedback, and recommend related products to increase repeat purchases.
SMS Marketing
SMS (Short Message Service) marketing is a highly effective way to reach customers directly on their mobile devices, driving engagement, sales, and brand awareness. By leveraging SMS campaigns, you can deliver targeted messages to your audience, promote products, and provide timely updates. Here’s how to incorporate SMS marketing into your Shopify strategy:
- Choose an SMS Marketing Platform
Start by selecting an SMS marketing platform that integrates seamlessly with Shopify. Look for platforms like SMSBump or Postscript that offer robust features, easy integration, and compliance with SMS regulations. Follow these steps to choose a platform:
- Research and compare different SMS marketing platforms based on features, pricing, customer reviews, and compatibility with Shopify.
- Install your chosen SMS marketing app from the Shopify App Store and follow the setup instructions to connect it to your Shopify store.
- Craft Engaging SMS Campaigns
Once your SMS marketing platform is integrated, you can start creating engaging SMS campaigns to connect with your audience. Consider the following types of SMS campaigns:
- Promotional Campaigns: Send SMS messages to promote sales, discounts, or exclusive offers to encourage purchases.
- Product Launches: Notify customers about new product releases or restocks to generate excitement and drive traffic to your store.
- Order Updates: Keep customers informed about their order status, shipping updates, and delivery notifications to provide a seamless shopping experience.
- Ensure Compliance with SMS Marketing Regulations
Compliance with SMS marketing regulations is essential to avoid legal issues and maintain trust with your customers. Follow these guidelines to ensure compliance:
- Obtain Explicit Consent: Before sending SMS messages to customers, ensure that you have obtained explicit consent from them to receive marketing communications via SMS. Provide clear opt-in options during the checkout process or through dedicated sign-up forms.
- Honor Opt-Out Requests: Provide customers with easy opt-out options to unsubscribe from receiving SMS messages. Include clear instructions on how to opt-out in each message and promptly honor opt-out requests to respect customers’ preferences.
- Comply with Regulations: Familiarize yourself with SMS marketing regulations, including laws such as the Telephone Consumer Protection Act (TCPA) in the United States, and ensure that your SMS marketing practices comply with these regulations.
💡Pro Tip: Use SMS Marketing Sparingly and Strategically
While SMS marketing can be highly effective, it’s essential to use it sparingly and strategically to avoid overwhelming your customers. Reserve SMS messages for important updates, flash sales, and time-sensitive offers to maximize their impact and minimize the risk of annoyance. Consider implementing the following strategies:
- Timing: Send SMS messages during optimal times when customers are likely to be receptive, such as weekdays during daytime hours.
- Personalization: Personalize SMS messages with recipients’ names or relevant information to increase engagement and relevance.
- Segmenting: Segment your SMS list based on customer preferences, behavior, or demographics to send targeted messages that resonate with specific audience segments.

Step 9: Analyze and Optimize
1. Analytics: Use the analytics provided by Shopify to track sales, customer behavior, and other key metrics.
2. Customer Feedback: Gather feedback from your customers to continuously improve your product offerings and website experience.
Shopify Analytics
Use the analytics provided by Shopify to track sales, customer behavior, and other key metrics.
Shopify Analytics is a powerful tool that offers insights into your store’s performance, helping you make informed decisions. Here’s how to utilize it effectively:
- Dashboard Overview: Start with your Shopify Analytics dashboard for a snapshot of your store’s performance, including sales, orders, and online store visitor data. This overview helps you quickly gauge the health of your business.
- Sales Reports: Dive into sales reports to analyze your revenue streams. Break down sales by product, channel (e.g., online store, social media, marketplace), and time period to identify trends and seasonal fluctuations.
- Customer Behavior Reports: Understanding how customers interact with your store is crucial. Shopify Analytics provides reports on customer visit frequency, how they navigate through your site, and where you might be losing them in the conversion funnel. This information can guide you in optimizing your store layout and product placement.
- Conversion Analysis: Use conversion rate reports to assess the effectiveness of your product pages and checkout process. Analyzing metrics such as cart abandonment rate can highlight areas for improvement, leading to increased sales.
- Product Analysis: Identify your best-selling products and those that may not be performing well. This insight allows you to adjust inventory levels, develop promotional strategies, and make data-driven decisions about product development.
- Marketing Reports: Evaluate the ROI of your marketing efforts with marketing and traffic reports. Understand which channels and campaigns drive the most traffic and conversions, helping you allocate your marketing budget more effectively.
- Custom Reports: For more specific needs, Shopify allows you to create custom reports. Tailor these reports to track metrics that are most relevant to your business strategy and goals.
Customer Feedback
Gather feedback from your customers to continuously improve your product offerings and website experience.
Customer feedback is invaluable for improving your Shopify store and ensuring customer satisfaction. Here are strategies to effectively gather and utilize feedback:
- Surveys and Questionnaires: Use tools like Google Forms or SurveyMonkey to create surveys that can be sent out post-purchase or through email newsletters. Ask about their shopping experience, product satisfaction, and what they’d like to see in your store.
- Product Reviews: Encourage customers to leave reviews on the products they purchase. This not only provides direct feedback on your offerings but also helps other customers make informed decisions. Shopify has built-in features and apps to facilitate product reviews.
- Feedback Forms on Your Website: Include a feedback form or contact form on your website. Make it easily accessible so customers can share their thoughts and suggestions at any time.
- Social Media Engagement: Utilize your social media platforms to engage with customers. Social media can be a less formal way for customers to express their opinions and experiences. Regularly monitor comments and direct messages.
- Live Chat and Support Channels: Implementing live chat on your Shopify store can provide immediate avenues for feedback and help identify issues in real time. It also improves customer service by addressing concerns promptly.
- Analyze Feedback Trends: Collect and analyze the feedback to identify common themes or recurring issues. This analysis can uncover areas for improvement in your product lineup, website usability, customer service, and more.
- Act on Feedback: Finally, act on the feedback you receive. Whether it’s tweaking your website design, adding new products, or improving your customer service, making changes based on customer feedback shows that you value their input and are committed to providing a superior shopping experience.
By leveraging Shopify Analytics and actively seeking out customer feedback, you can create a data-driven strategy for growing your store, enhancing customer satisfaction, and ultimately boosting your bottom line.
💡Analytics Tips
Google Analytics 4 Tracking
Google Analytics is a powerful tool that allows you to track and analyze various aspects of your website’s performance, including traffic, user behavior, and conversions. By integrating Google Analytics with your Shopify store, you can gain valuable insights into how visitors interact with your site and make data-driven decisions to optimize your marketing efforts and improve your store’s performance. Here’s how to set up and utilize Google Analytics 4 tracking for your Shopify store:
- Set Up a Google Analytics Account and Obtain a Tracking ID
If you haven’t already done so, you’ll need to create a Google Analytics account and set up a property for your Shopify store. Follow these steps to get started:
- Visit the Google Analytics website (analytics.google.com) and sign in with your Google account.
- Follow the prompts to create a new account and set up a property for your Shopify store.
- Once your property is created, you’ll be provided with a tracking ID (also known as a Measurement ID) that you’ll need to integrate with your Shopify store.
- Integrate Google Analytics with Your Shopify Store
After obtaining your Google Analytics tracking ID, you’ll need to integrate it with your Shopify store. Here’s how to do it:
- Log in to your Shopify admin dashboard and navigate to “Online Store” > “Preferences.”
- Scroll down to the “Google Analytics” section and paste your Google Analytics tracking ID into the “Google Analytics Account” field.
- Click “Save” to apply the changes. Your Shopify store is now linked to your Google Analytics account, and data will begin to be collected.
- Configure Ecommerce Tracking
To monitor sales, conversions, and customer behavior effectively, it’s crucial to enable ecommerce tracking in Google Analytics. This allows you to track key metrics such as revenue, conversion rates, and average order value. Here’s how to configure ecommerce tracking:
- In your Google Analytics account, navigate to your property settings and enable Enhanced Ecommerce tracking.
- Follow the setup instructions provided by Google to implement ecommerce tracking on your Shopify store. This may involve adding additional tracking code snippets to your store’s code or enabling specific settings within Google Analytics.
Once Google Analytics tracking is set up for your Shopify store, it’s essential to regularly review the data and extract actionable insights to improve your store’s performance. Consider the following strategies:
- Regular Review: Set aside time to review your Google Analytics data regularly. Monitor key metrics such as traffic sources, conversion rates, and user behavior to identify trends and areas for improvement.
- Custom Reports: Create custom reports in Google Analytics to track specific metrics that matter to your business. Customize reports to focus on areas such as product performance, marketing campaign effectiveness, or customer demographics.
- Experimentation: Use Google Analytics data to inform your decision-making process and experiment with different strategies to optimize your store’s performance. Test different marketing tactics, website layouts, and product offerings based on insights gleaned from your data.
In Conclusion
Setting up a successful Shopify store requires careful planning, strategic execution, and ongoing optimization. By following the comprehensive guide outlined in this blog post, you’ll be equipped with the knowledge and tools needed to create a thriving ecommerce business on Shopify. From choosing the right plan and designing your store to implementing effective marketing strategies and leveraging emerging platforms like TikTok, every step is crucial to your success.
However, if you find yourself needing expert guidance or support along the way, Coalition Technologies is here to help. As a leading Shopify partner, we specialize in delivering customized solutions and unparalleled expertise to elevate your online store and drive tangible results. Take the next step towards achieving your ecommerce goals and partner with Coalition Technologies today. Let’s build something extraordinary together.
Table of Contents
- 1 Step 0: Prep Work
- 2 Step 1: Setting Up Your Shopify Plan
- 3 Step 2: Setting Up Your Store
- 3.1 Add Your Products
- 3.2 💡Merchandising Tips
- 3.2.1 Enhance Product Listings with High-Quality Content
- 3.2.2 Organize Products Into Categories and Collections
- 3.2.3 Optimize Your Product Presentation
- 3.2.4 Use Product Recommendations and Featured Products
- 3.2.5 Implement Upselling and Bundling Strategies
- 3.2.6 Regularly Update Product Displays and Promotions
- 3.2.7 Monitor Performance and Optimize Continuously
- 4 Step 3: Customize Your Store
- 5 Step 4: Set Up Payments
- 6 Step 5: Configuring Shipping
- 7 Step 6. Setting Up Taxes
- 8 Step 7: Prepare for Launch
- 9 Step 8: Market Your Store
- 10 Step 9: Analyze and Optimize
- 11 In Conclusion


Work with Coalition
If you want to future-proof your website and generate more revenue, contact us today. Our exceptional team of web designers and developers will review your website and provide you with an analysis, strategy, and timeline that includes a competitor strategy review for free. We can get you started immediately, so call us right now at (310) 827-3890 and start making more money.